It’s quite easy to manually create an author box in WordPress if you are familiar with the basic concepts of PHP and WordPress itself. The process doesn’t require too many lines of code, especially if you can count on the host theme’s stylesheet to style your additions.
That being said, there are still a lot of reasons why many people prefer to use a plugin for creating an author box in WordPress.
In order to cater to both sides, this article will explain how you can manually create (code) an author box in WordPress and will provide you with an alternative (a suggestion for an author box plugin) if you find the whole coding process too complicated.
So let’s see what we have in store for you!
What is an author box in WordPress?
An author box is a section at the bottom of your blog post or article that provides information about the author behind the content. It’s usually considered to be a very important part of every blog post/article because it gives readers insight into the author’s authority on the subject matter that is being discussed.
In WordPress, an author box usually consists of a text area that displays the author’s biographical information, a picture from the author’s Gravatar account, links to the author’s social media accounts and sometimes links to older posts written by the author.
Why do you need to add an author box to your blog?

Having an author box comes with lots of benefits, most of which are targeted at improving your reader’s user experience and your website’s credibility, just to name a few.
The following are just some of the reasons why you need to have an author box on your WordPress site/blog:
- To educate readers about your authors – The content on a website is only complete when it includes information about its authors. The information helps the audience ascertain the quality and the source of the content they are consuming on your blog.
- To authenticate your blog – By allowing your readers to learn about the people behind each piece of content you publish helps in making your blog and its authors seem more authentic.
- To promote authors – By disclosing the author’s information on your blog you add your blog to the author’s portfolio, thereby increasing the author’s “value” in their respective niche.
- To increase blog credibility – If your readers are able to find the source of every post and become familiar with your authors, your blog becomes very reliable and credible in their eyes.
- To keep your blog more organized – An author box which includes the links to the author’s latest posts helps your audience quickly navigate to other posts written by the same author, instead of having to search through your website in order to find them.
- To make your authors easily reachable for your readers – If you include your authors’ social media links in the author boxes, your readers can easily contact or even socialize with them which can make your blog look more realistic and the content on it more genuine.
Methods of adding an author box in WordPress

If your website is a personal blog or only has one author, then you can simply choose to hard-code the author box in your single.php file since you don’t have to store or dynamically output any information from the WordPress database. In other words, you can build your author box using HTML. However, this is not a recommended method.
Adding an author box to WordPress themes that provide author box support
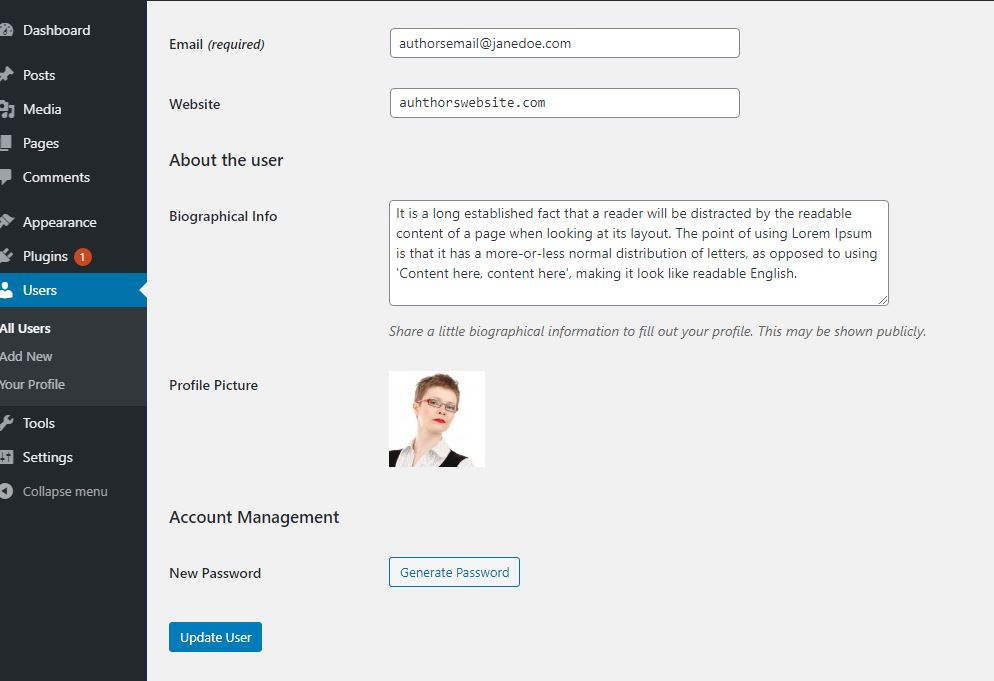
WordPress themes that come with author box support, will allow you to add an author box simply by filling out the information for each of your authors and uploading their pictures from Gravatar. This method will automatically include the info for each author at the end of their blog posts.
Steps for making this happen:
- Click on the Users tab on your WordPress admin dashboard
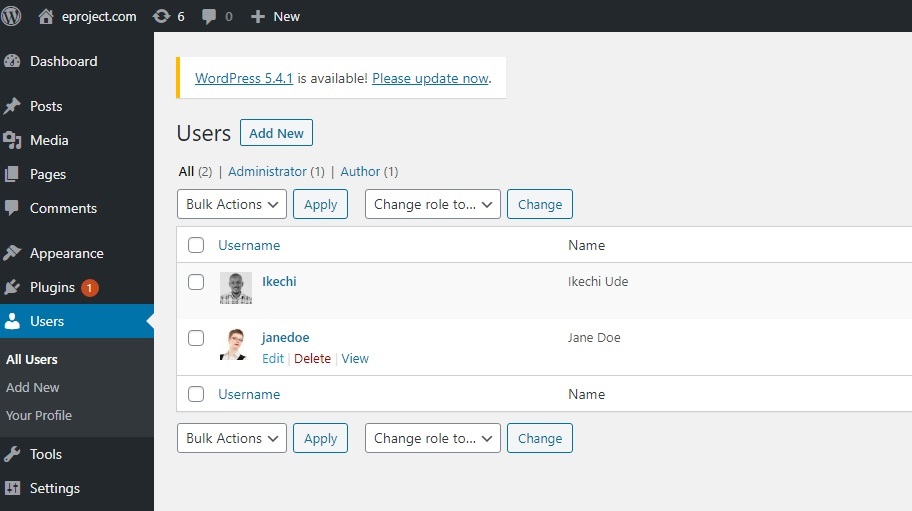
- Place your mouse on an author’s name to reveal the available WordPress options
- Click on the Edit option and enter the author’s information in the Edit User page
- Click on the Update User button after filling out all the necessary info.
Manually create (code) an author box in WordPress

This method will require you to include a few lines of code in the single.php or functions.php file which is located in the main folder of your WordPress theme.
To do so, you first need to know how to find the file.
For finding the file, available to you are the following three methods: through your WordPress dashboard, using an FTP client, and through your cPanel file manager. The first method is the easiest and the one we will now demonstrate.
Before we start explaining the process, there is one very important thing we have to note:
This method of editing the single.php file will require the use of a Theme editor. When using the theme editor, making even the slightest mistake could lead to the White Screen Of Death, in other words, a complete crash of your site. For this reason, we would recommend you go with the FTP method.
But if you are set on using the theme editor and are willing to take the risk, then you should at least have a tool that can get you out of any sticky situation that might occur.
A tool like that is WP Reset, a plugin which is used to reset your site in seconds but most importantly a plugin that has something called the Emergency Recovery Script which fixes the White Screen Of Death in an instant and enables you to configure your site even when it is down by allowing you to: rescan and reinstall core files, deactivate plugins one by one or in bulk, activate and deactivate a theme, reset user roles and privileges, create a new admin account, and update URLs. Basically, WP Reset can patch up any error you might make in this process.
Steps for manually adding an author box through your theme’s single.php file:
To start things off, you first need to complete the steps mentioned in the previous method, the steps explaining how to add author information to WordPress themes that come with author box support. By doing this you will provide WordPress with data for each user which our PHP code will later utilize.
Next, you need to do these three things:
- Click on Appearance, and then on Theme Editor on your WordPress admin dashboard
- Select the Single Post (single.php) file located in section on the right-hand side, labeled Theme Files
- Right below the “the_content()” function in your loop for retrieving blog posts, and above the main div container for your content, insert the following lines of code, and after doing that click on the Update File button
Another important note:
Before editing or copying any code into it the single.php file, you need to create a copy of it using an FTP client. Doing this makes it possible for you to revert back to the original file in case there are any errors in the new code that you added to the file. WP Reset can help you out in this case as well, since it can, in a click, reset your entire site or just certain aspects of it back to a clean and error-free state.
The code provided below can only be used in the single.php file or other related templates, but not in your functions.php file.
<div class="about-author">

<div class="about-author-image">

<?php echo get_avatar(get_the_author_meta('ID'), 250); ?>

</div>

<div class="about-author-text">

<h3>About <?php echo get_the_author_meta( 'display_name'); ?></h3>

<?php echo wpautop(get_the_author_meta('description')); ?>

<a href="<?php echo get_author_posts_url(get_the_author_meta('ID')); ?>">View all posts by <?php the_author(); ?></a>

</div>

</div>
The two div containers above (classed “about-author-image” and “about-author-text”) hold the author’s image and biographical information. The author’s avatar inside the image container, is retrieved using the get_avatar() function, in which we passed two parameters: the author’s ID and the image size in pixels. Once the parameters are passed, the gravatar which is associated with the email address you inserted in the Edit User page is then retrieved.
Similarly to that, we used the get_the_author_meta() function to retrieve the author’s description which is inserted in the author’s User page.
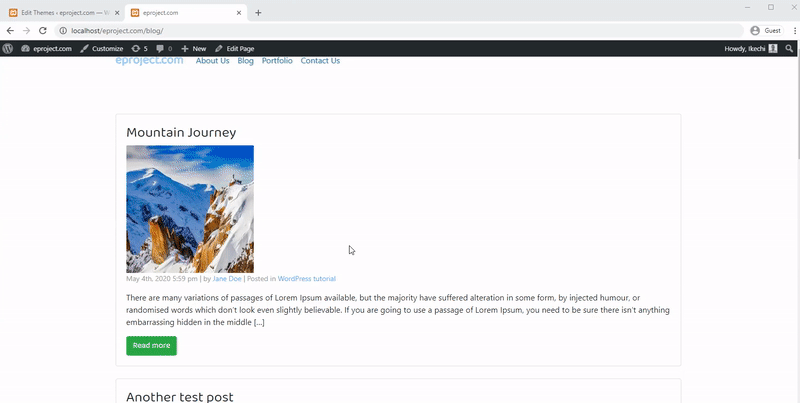
You will be able to style the now-added author box as you please. The author box that is shown in the visual above was styled using the following CSS code:
.about-author {

background-color: #f8f9fa;

padding: 20px; }
.about-author::after {
content: “”;
clear: both;
display: table; }
.about-author-image {
float: left;
width: 20%; }
.about-author-text {
float: right;
width: 75%; }
Adding an author box in WordPress with the help of a plugin
As mentioned earlier, editing your WordPress theme files can be very dangerous even if you’re quite familiar with WordPress, because an error of any kind, could easily break your theme. If this happens and your website is not set to maintenance mode, all the visitors of your site will witness the mess and will have to wait for you to fix the error until they can normally browse your site.
But creating an author box in WordPress shouldn’t be a reason why you would place your website in maintenance mode for a long time.
Why? Because if you use a user-friendly WordPress plugin for creating your author boxes, a plugin such as Simple Author Box, you can complete the entire process in under 5 minutes without any risk involved.
The Simple Author Box plugin

The Simple Author Box plugin does not only add a responsive author box at the bottom of every post on your blog, but it also allows you to enrich the author box with things such as special color schemes, typography, social media icons and so much more.
The plugin allows you to fully customize the design of your author box for a seamless blend with your theme and will introduce an advanced biographical info text field to it as well; with the option to choose between a text and a visual editor. The Simple Author Box plugin will also allow you to change your author’s avatar without having to do it directly on the Gravatar page.
Some of the things this plugin is capable of:
Can display information for multiple authors – The author box you create using this plugin can display the name, website, gravatar, custom image, bio, and social media icons for more than one author.
Provides user-friendly customization – The Simple Author Box plugin allows full customization of your author box, all through a user-friendly interface.
Creates mobile-friendly author boxes – Any author box you create with the help of this plugin will be fully responsive and will render in a different version depending if it’s being viewed on a tablet, mobile phone, or desktop.
Allows manual insertion of author boxes – If you don’t want your author box to be added automatically, you can opt to insert it yourself, manually, either into the single.php or the author.php file.
Allows direct author image uploading – Unlike the conventional method of including the author’s image which allows you to only use images associated with the author’s Gravatar account, the Simple Author Box plugin allows you to display custom images that you directly uploaded to your WordPress site.
Has support for RTL languages – The Simple Author Box plugin didn’t forget about users whose languages feature writing which goes in a right to left direction. All they need to do is just toggle the RTL button in the plugin’s settings tab to make their text go in the preferred direction.
Has support for AMP – Thanks to being embedded with this framework, the Simple Author Box plugin allows your reader’s browsers to load your blog posts quickly on mobile devices.
Supports the “Author’s” widget – To promote navigation onto the work of your blog’s many authors, you can activate the Simple Author Box Author’s widget feature. This feature will render a gallery of your authors with links leading to their posts.
Allows adding guest authors and co-authors – In a conventional author box, there are no options for including co-authors to articles or blog posts that were written by more than one author. Similarly to that, the option to add a guest author is also not available. But using the Simple Author Box plugin, both of these can easily be included.
Add an author box using the Simple Author Box plugin
The first step you need to complete is to install and activate the Simple Author Box plugin. This can be done in two ways:
1. Installing the plugin using downloaded plugin files
- Download the Simple Author Box plugin from here
- On your WordPress dashboard, click on Plugins > Add New
- Click on the Upload Plugin button in the Add Plugins window
- Click on the Choose File button and locate the simple-author-box zip file. It should be in your default download location (download folder)
- Click on the Install Now button and then activate the plugin once the installation is completed.

2. Installing the plugin from the WordPress repository
- Click on the Plugins menu on your WordPress dashboard and then on the Add New option
- Enter “Simple Author Box” in the search box and hit the enter key
- The search results should pull up a plugin created by WebFactory Ltd with the exact same name that you typed in.
- Click on the Install Now button in the plugin’s description box and activate it as soon as the installation is completed.
- Set and save the plugin settings
After a successful installation and activation of the plugin, a new tab labeled “Simple Author” should appear below the settings tab on your WordPress dashboard. Click on the tab to customize your author box and to include additional author information. As soon as you’re done, click on the Save Settings button and your author box will be live on your blog posts.

Final thoughts – plugins offer more flexibility and minimal risk
It’s only recommended to manually create (code) an author box in WordPress if it’s absolutely necessary. Otherwise, you should simply use an author box plugin such as Simple Author Box in order to avoid the many dangers associated with editing your WordPress theme files.
Plugins that were specifically built for creating an author box will almost always include many features unavailable in conventional author boxes.
As you saw in this article, that is absolutely true for the Simple Author Box plugin since it will allow you to upload author images directly through your WordPress admin dashboard, improve the biography text field by adding links instead of using HTML codes, incorporate multiple social links, guest authors and co-authors, and do so much more on top of that as well.