Life in the 21st century is swift, and virtually everything happens online these days. Social media, university classes, language courses, we even order takeout using apps these days. Life has become so busy that the number one priority seems to minimize the time we need to spend going about our day-to-day tasks and trying to broaden that little window of free time we have left every day.
Communication works much in the same way. Just think about it when was the last time you actually wrote a long text or even called someone, for that matter (your grandparents don’t count). It doesn’t matter if we’re trying to connect with a friend or buy a new product we’re interested in. If you have any questions, the best option seems to be a chat.
So, if you’re a business owner looking to provide better customer service, it’s high time you embrace the power of chat. It’s efficient, fast, and saves everyone mounts of time.
New Approach to Customer Service

If you are spending any amount of time online, you’ve probably noticed that many sites nowadays opt for live chat in place of the original helpdesk or a call-in-line. Even huge companies like Booking.com now predominantly use live chat to deal with their customer complaints and requests.
And they’re right in doing so; as we previously hinted, live chat has numerous advantages over traditional customer service. Agents can prepare better, it takes less time, and if a customer is unsure of something and needs time to retrieve the data, you can work on multiple cases simultaneously.
Plus, chatting comes naturally. You do it with your co-workers and friends. It’s just more comfortable for everyone involved. For these reasons and many others, it’s virtually necessary to implement live chat as a feature of your company’s customer service.
A tool that can perform pretty much every task you need it to when it comes to this type of communication is 3CX Live Chat. It’s pretty much a total all in one communication solution. We’ll go through the live chat plugin in detail to show how it can be the perfect solution for your business.
Today, we’ll be focusing on the WordPress side of things the most since we run our sites on WordPress, but it’s pretty easy to get the hang of it on any platform.
Calls and Video
Before we get into the nitty-gritty and present the features 3CX Live Chat has to offer in full, we’d like to take a few moments to talk about what truly makes this tool stand out amongst other similar options available. The first thing is the added features of calls and video chat.
Sure, chat is important, but that doesn’t mean that it is always the best method of communicating with customers. At times the problem is too complex to explain over the messages. This is where 3CX Live Chat comes in. The customer can reach the same operator using the call button directly from the live chat bubble without having to look for numbers or repeat the same issue again to a new agent.
You also have the option to switch this feature off, however, since the calls are taking place over the browser – a tight budget will not be the reason for this. Thanks to 3CX Talk links, your web visitors can reach you directly by just clicking the link, and there will be no added costs on either side.
This is all possible thanks to the plugin working together with the 3CX StartUP. There are no hidden payments, no catch, no paywalls, and restricted features. Having said that, if you’ve ever considered adding a live chat function to your website – the time is now. So, let’s examine this tool more closely.
Other Key Features
- Interact using web, iOS, and Android apps
- Easy to use interface integrates calls, live chats, FB &SMS
- Assign chats to a particular agent, or have groups of agents answering
- Includes desktop notifications
- View missed chats and chat history
- Pop-out chat box
- Customizable design
- No advertising or powered by link
- No monthly subscriptions required
Installation and First Steps
3CX StartUP doesn’t even require installation. Since it’s hosted on a shared instance, you’re leaving most of the grunt work like setup, installation, and system updates to 3CX while you reap the benefits. Pretty neat, right?
It can be an excellent option for those relatively new to the game, such as startups and small businesses since there is a limitation of up to 20 users with this plan. There is no need for an in-house IT specialist, you can avoid absolutely all communications costs while getting access to the top-notch, all-in-one solution.
Before you do anything, you’ll need to complete the setup process in your browser. First comes the 3CX system, after which you’ll be able to configure the plugin. To start off, you’ll have to:
- Sign up for your free account.
- Add your employees as agents and define their access to the system (managers, receptionists, standard users).
- Determine if you’ll use a SIP Trunk, which is used for inbound and outbound calls. In case you’ll use only the Live Chat and internal communication, feel free to skip this step.
- Now you can start setting up your live chat by clicking on “Yes” and selecting if you have a WordPress website. Enter your website URL and followed by “Set” if you have a site.
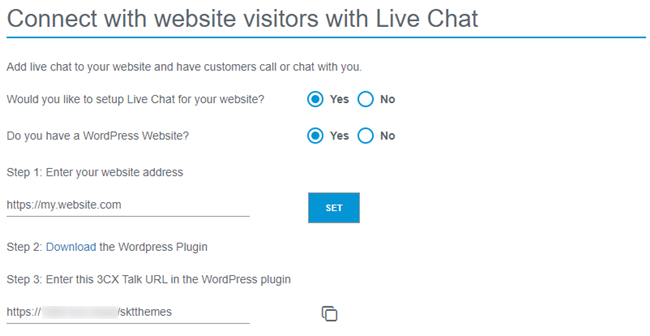
- You’ll need to link the Web Client to the plugin, so download and activate the plugin and then copy the 3CX Talk URL and save it, we’ll get into the plugin setup shortly. The 3CX Talk link is what’s used to connect your website to your StartUP account, sharing data that includes chats, calls, and video calls. Everything is run through the user’s browser, so there’s no need for telephone calls.
- With that, you’re done. Through the “Login” button, you can access your dedicated 3CX Web Client, which is the place all your customization options and chat messages are located.
After signup, you’ll have to set up your 3CX Live Chat.
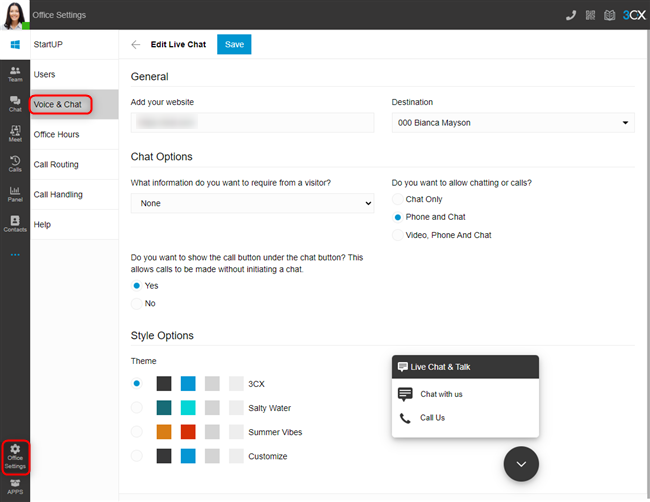
- To set up Live Chat so that calls and messages can be answered from the Web Client, go to “Office Settings > Voice & Chat” and click on the pencil icon.
- The wizard process will already have filled out your website address, but you can modify it now or later if you wish.
- The “Destination” field shows where live chat messages or calls will be sent. To change the “Destination,” navigate to “Office Settings > Call Routing” and choose your destination. By default, the live chat will be routed to a ring group, enabling all members of the group to answer.
- Under the “Chat Options” section, use the drop-down selection to choose what information your visitors need to provide before contact.
- Use the radio buttons to choose if you want to allow “Chat Only,” “Phone and Chat,” or “Video, Phone, and Chat.”
- Using the radio button, you can show or hide the “Call us” option in the chat bubble.
- Under “Style Options,” choose from one of the three pre-defined themes or select “Customize” for a more free-form approach.
- Use the preview of the chat bubble to interact and test the functionality and click “Save” when you’re ready.
Once you have your Web Client set up, you can access all of the conversations with your web visitors without burdening the speed of your website.
But in addition, to centralize communication, you can utilize Facebook, SMS, and CRM integrations to keep everything in one place and allow members of the team to access all information from a single interface.
The WordPress Plugin
Once you’ve completed the previous steps, you can head to eb client to complete the process. Some basics need to be configured, and then some more advanced options that you essentially don’t have even to touch if you don’t want to. The plugin will function either way, but modifying the plugin to fit your business specifically can be very beneficial.
Before you modify it, however, first, you need to complete the setup.
- Log in to the admin panel of your WordPress website
- Navigate to “Plugins” and click “Add New” at the top of the page
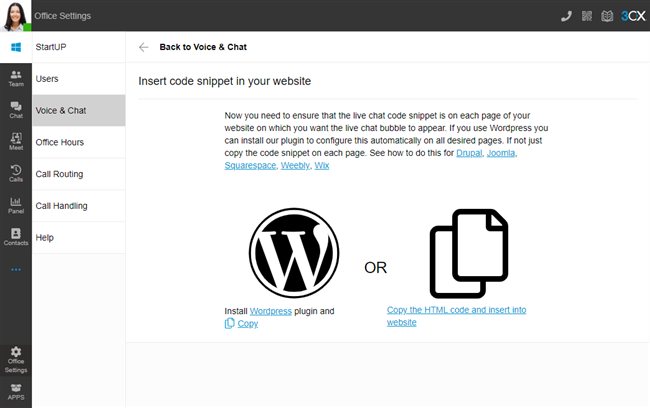
- Click on “Upload Plugin” at the top and choose the file you downloaded during the sign-up process beforehand. You can also get this from the Web Client in “Office Settings > Voice & Chat” and click the ‘i’ icon next to the pencil icon. Click “Install Now.”
- After installation, click on “3CX Live Chat NextGen” in the sidebar
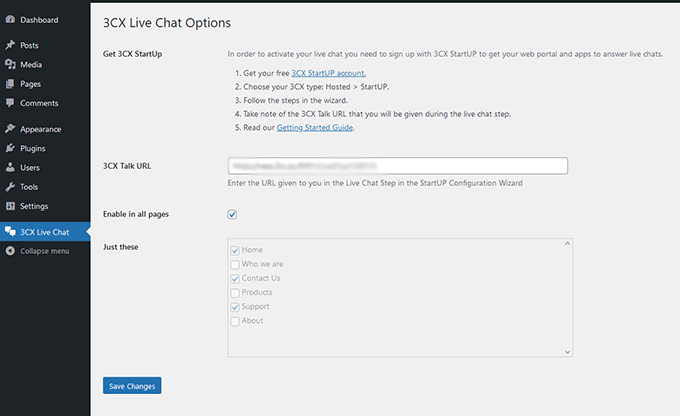
- Paste the URL you copied earlier (the 3CX Talk URL). If you haven’t copied it, you can find it again through the Web Client in “Office Settings > Voice & Chat” under the “Information” field or within the confirmation email you received.
- Either tick the box to show the chat on all pages or use the tick boxes below to select individual pages. When you’re done, just click the “Save Changes” button.
General Settings and Chat Box
Naturally, if you want the plugin to work, you’ll first have to enable the live chat plugin – it’s the first option presented on the dashboard. Other options include tweaking the General Settings tab, enabling the plugin on mobile devices, playing that all-too-familiar “ding” sound whenever you receive a notification, using details of the logged-in users, and so forth.
Customization
Aside from being functional, a chatbox also needs to fit your overall aesthetics and be on-brand with the rest of your business. The styling tab is all about keeping up appearances and securing that great first impression.
These minor tweaks such as themes, titles, custom colors, effects, and animation can seem a tad trivial. But combined can make a powerful impact. Make the chat button fit with the aesthetics of your overall site and make it stand out.
Offline Messages
Virtually no business aside from massive conglomerates can afford to have a 24/7 live chat service. With 3CX Live Chat, you can easily set up operating hours and prepare a handful of automated messages to help out customers with some more staple questions even when the agents are not online.
The Web Client
Now that you pretty much have the plugin all set up and customized to the point where you’re satisfied, let’s take a closer look at the web client.
The main thing the devs wanted to do is bring a streamlined solution that’s compact and easily accessible. With the options to install the app on your mobile device or desktop or simply open the system up through the web browser – you can respond to your customer requests from anyways. As such, it’s targeted toward small businesses that need a reliable live chat option without having to compromise on system flexibility or features.
Without a doubt, the web client succeeds in its goal. It’s an all-in-one communications interface that features CRM, Facebook messenger, and SMS integration, essentially eliminating the need for any other communications app on your site. Adding to this is the host of management actions you’ll get to make like adding users, opening chats, starting calls or video meetings, etc. Having just one piece of software that can do all this makes it much easier to run a more efficient business.
Because working on the fly is so common nowadays, it comes as no surprise that the 3CX Web Client is a much better alternative to WordPress for work on smaller devices. If you had just the plugin, it would be quite awkward to use with your smartphone, for example, as anyone who’s tried it will tell you.
The client, however, is “cloud native,” works in any browser, and is scalable to any device and screen with the mobile app. You could be going to work and already be handling issues your visitors have encountered.
Wrapping Up
3CX Live Chat is a modern tool offering plenty of features to any business wanting to take customer service seriously. It’s suitable for experienced users and newcomers alike, albeit with little practice.
Considering that the whole service is free and comes with both the plugin and the web client with the StartUP package, there are no risks or commitments involved in trying out the plugin.